Marbled Vanilla Chocolate Cake
Highlighted under: Home-Style Dessert Bakes
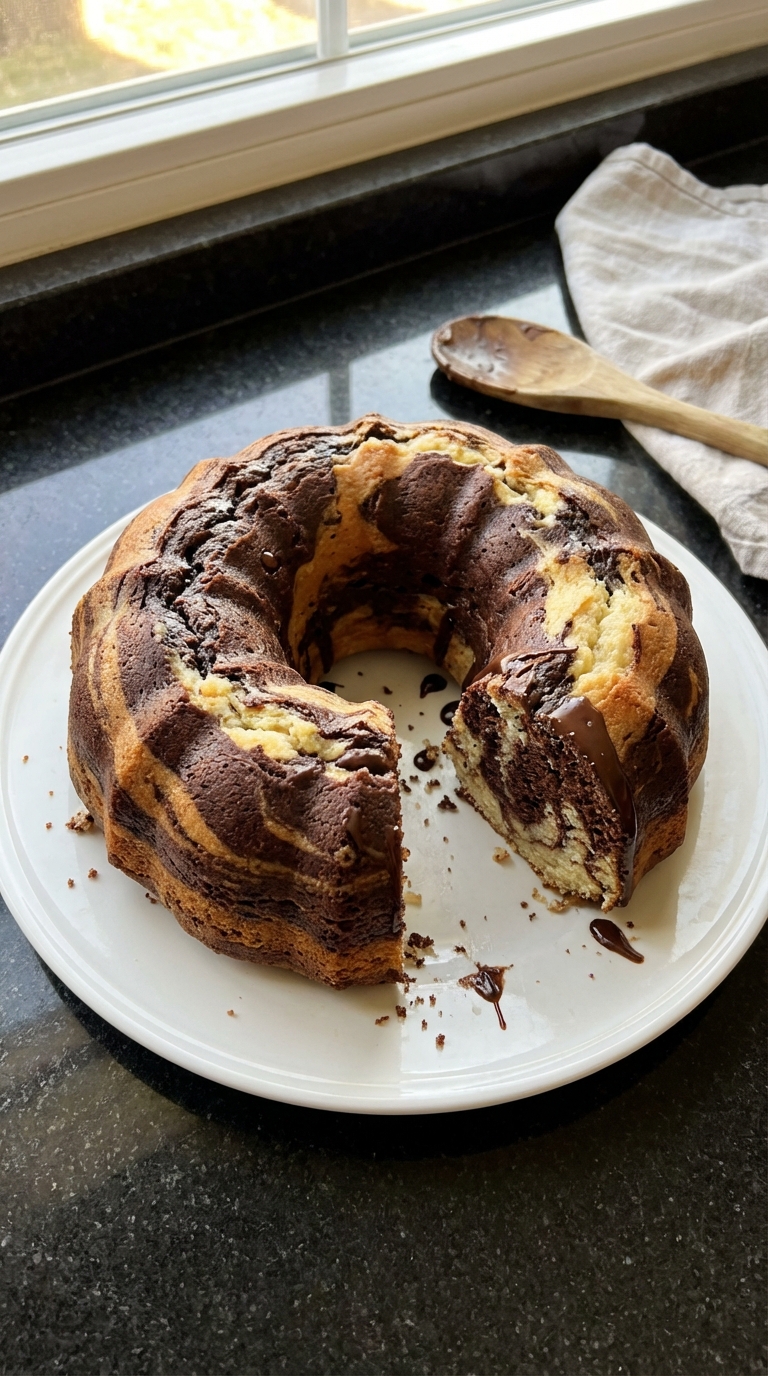
I absolutely love making this Marbled Vanilla Chocolate Cake for special occasions and family gatherings. The combination of rich chocolate and creamy vanilla creates such a delightful balance that everyone enjoys. It brings back fond memories of baking with my grandmother, who always encouraged me to experiment with flavors. The marbling technique adds a beautiful visual twist that elevates this cake from ordinary to extraordinary, making each slice a sweet surprise packed with both chocolatey and vanilla goodness.

While preparing this Marbled Vanilla Chocolate Cake, I discovered that the key to perfect marbling is to use two contrasting batters that are just the right texture. If one is significantly denser than the other, they won't blend well. I spent a bit of time experimenting with my ingredients to ensure that this delightful cake not only looked stunning but also tasted delicious.
The chocolate batter is made with high-quality cocoa powder for that deep, rich flavor, while the vanilla batter boasts a touch of real vanilla extract. This combination not only pleases the eye but also the palate, making each bite a balance of flavors that is simply irresistible.
Why You'll Love This Cake
- The stunning marbled effect that's a feast for the eyes.
- A harmonious blend of decadent chocolate and smooth vanilla flavors.
- Perfectly moist texture that keeps everyone coming back for seconds.
Mastering the Marble Technique
The marbling technique in this cake is what truly makes it special. To achieve a beautiful swirl, it's crucial to use a gentle hand. After spooning the two batters into the pans, use a knife to dip in and swirl, but be careful not to overmix. You want distinct ribbons of chocolate and vanilla to remain visible, which not only enhances the appearance but also creates delightful flavor pockets in each slice.
When swirling, aim for an '8' shape inside the batter; this motion allows for better integration without losing the contrast of the two colors. The key is to create a balance—too much mixing will yield a solid color rather than the sought-after marbled effect. You’ll know you’ve perfected it when you see the chocolate and vanilla perfectly intertwined yet distinct.
Understanding Ingredients
Each ingredient in this Marbled Vanilla Chocolate Cake plays a pivotal role. The combination of all-purpose flour and baking powder provides the necessary structure and lift, creating a cake that’s not too dense. For an elevated flavor, ensure your butter is softened to room temperature, which helps in creating that light and fluffy texture when creamed with sugar. If you’re short on butter, you can substitute unsweetened applesauce for a lower-fat option, though the flavor might slightly differ.
Cocoa powder is essential for that rich chocolate flavor. Choosing a high-quality cocoa can make a significant difference; Dutch-processed cocoa offers a smoother, richer taste compared to natural cocoa. For a well-balanced cake, don't skimp on the vanilla extract. It’s a simple addition, but it enhances the overall sweetness and complexity of the cake, harmonizing perfectly with the chocolate.
Storage and Serving Suggestions
To store your Marbled Vanilla Chocolate Cake, allow it to cool completely, then wrap it tightly in plastic wrap or aluminum foil, or place it in an airtight container. It can be stored at room temperature for 2-3 days. For longer storage, refrigerate for up to a week. If you want to freeze it, slice the cake and wrap individual pieces; they’ll keep well for up to three months. Just make sure to thaw them overnight in the refrigerator for the best texture.
When it comes to serving, this cake pairs wonderfully with a light vanilla buttercream or cream cheese frosting. For an extra flair, drizzle some melted chocolate or caramel on top before serving. If you’re feeling adventurous, consider adding fresh fruit as a topping; strawberries or raspberries can add a lovely tartness that complements the sweetness of the cake beautifully.
Ingredients
Ingredients
For the Cake
- 1 3/4 cups all-purpose flour
- 1 1/2 teaspoons baking powder
- 1/2 teaspoon salt
- 1/2 cup unsweetened cocoa powder
- 1 cup sugar
- 1/2 cup unsalted butter, softened
- 3 large eggs
- 1 teaspoon pure vanilla extract
- 1 cup milk
Make sure to use quality ingredients for the best flavor.
Instructions
Instructions
Preheat the Oven
Preheat your oven to 350°F (175°C). Grease and flour two 9-inch round cake pans.
Mix the Dry Ingredients
In a bowl, whisk together flour, baking powder, salt, and cocoa powder. Set aside.
Cream the Butter and Sugar
In a large mixing bowl, cream together the softened butter and sugar until light and fluffy.
Add Eggs and Vanilla
Beat in the eggs one at a time, then stir in the vanilla extract.
Combine Wet and Dry Ingredients
Gradually add the dry ingredients to the butter mixture, alternating with the milk. Mix until just combined.
Marble the Batter
Spoon half of the vanilla batter into the prepared pans. Add spoonfuls of the chocolate batter on top, then use a knife to swirl the batters together for a marbled effect.
Bake the Cakes
Bake in the preheated oven for 30-40 minutes, or until a toothpick inserted into the center comes out clean.
Cool and Serve
Allow the cakes to cool in the pans for 10 minutes, then invert onto wire racks to cool completely. Frost with your favorite frosting if desired.
Let the cake cool completely before frosting for the best results.
Pro Tips
- For an extra touch, sprinkle some powdered sugar on top before serving.
Troubleshooting Common Issues
If your cake sinks in the middle after baking, it may be due to underbaking or excessive mixing of the batter. Always check for doneness with a toothpick; it should come out clean or with a few moist crumbs. Additionally, be cautious not to open the oven door too often during baking, as this can cause temperature fluctuations that might lead to collapse.
Another common issue is a dry cake. To avoid this, measure your flour accurately; too much flour can result in a dense, dry outcome. Instead of packing the flour into the measuring cup, spoon it in and level it off with a knife. Also, incorporating the milk gradually ensures that the batter stays moist throughout the mixing process.
Make-Ahead Options
This Marbled Vanilla Chocolate Cake is an excellent candidate for make-ahead preparation. You can bake the layers a day in advance and store them wrapped in plastic. Just make sure they are completely cooled before wrapping to prevent moisture buildup. This not only saves time on the day of your gathering but allows the flavors to meld even more.
If you decide to prepare the batter ahead of time, you can refrigerate it for up to 24 hours. However, I recommend giving it a gentle stir before using, as chilling may affect the batter's consistency. Keep in mind that you may need to add a few extra minutes to the baking time when using chilled batter.
Questions About Recipes
→ Can I use milk alternatives in this recipe?
Yes, almond milk or oat milk can work as great substitutes for regular milk.
→ How do I store the cake?
Store the cake in an airtight container at room temperature for up to 3 days.
→ Can I freeze this cake?
Absolutely! You can freeze the cake wrapped tightly in plastic wrap for up to 3 months.
→ What frosting pairs well with this cake?
Buttercream or cream cheese frosting are fantastic choices to complement the flavors.
Marbled Vanilla Chocolate Cake
Created by: The Tinastastyrecipes Team
Recipe Type: Home-Style Dessert Bakes
Skill Level: Intermediate
Final Quantity: 8 servings
What You'll Need
For the Cake
- 1 3/4 cups all-purpose flour
- 1 1/2 teaspoons baking powder
- 1/2 teaspoon salt
- 1/2 cup unsweetened cocoa powder
- 1 cup sugar
- 1/2 cup unsalted butter, softened
- 3 large eggs
- 1 teaspoon pure vanilla extract
- 1 cup milk
How-To Steps
Preheat your oven to 350°F (175°C). Grease and flour two 9-inch round cake pans.
In a bowl, whisk together flour, baking powder, salt, and cocoa powder. Set aside.
In a large mixing bowl, cream together the softened butter and sugar until light and fluffy.
Beat in the eggs one at a time, then stir in the vanilla extract.
Gradually add the dry ingredients to the butter mixture, alternating with the milk. Mix until just combined.
Spoon half of the vanilla batter into the prepared pans. Add spoonfuls of the chocolate batter on top, then use a knife to swirl the batters together for a marbled effect.
Bake in the preheated oven for 30-40 minutes, or until a toothpick inserted into the center comes out clean.
Allow the cakes to cool in the pans for 10 minutes, then invert onto wire racks to cool completely. Frost with your favorite frosting if desired.
Extra Tips
- For an extra touch, sprinkle some powdered sugar on top before serving.
Nutritional Breakdown (Per Serving)
- Calories: 380 kcal
- Total Fat: 26g
- Saturated Fat: 15g
- Cholesterol: 195mg
- Sodium: 85mg
- Total Carbohydrates: 32g
- Dietary Fiber: 3g
- Sugars: 24g
- Protein: 6g